
THE ULTIMATE GUIDE:
Trekking Poles for a Disability
Trekking poles improve your stability and help you keep your balance—and they are one of the most overlooked walking aids for those with multiple sclerosis. By using both poles you can better distribute your weight, lightening the workload on your legs and lessening fatigue. The guide looks at the types of trekking poles available, what to look for when purchasing a pair, and how to properly use them.

One look at a symptom list for multiple sclerosis and you’d think twice before hiking up to an active volcano, trekking in the Himalayas, or traversing the Sahara Desert. Balance problems, gait issues, numb feet, double vision, muscle weakness, spasticity, blah, blah. Which is exactly why a set of trekking poles—offering more flexibility and support than a single pole or cane—makes such sense for MSers. Hell, a pair of poles helped me complete the above adventures (in Costa Rica, Bhutan and Morocco). While walking staffs and canes are suitable for flat ground, trekking poles are especially adept at handling rough trails and hilly terrain—as well as the flats. By using both poles you are able to better distribute your weight, lightening the workload on your legs and reducing stress on your knees, feet, hip and back. In addition, less pressure and strain on your lower body means less fatigue, a critical issue many of us MSers face. Of course, the largest benefit of trekking poles: they improve your stability and help you keep your balance.
Trekking poles have saved my behind (literally) on countless occasions, which I discovered early in my MS diagnosis when my right leg pretty much decided to take a vacation. But by using trekking poles to catch the numerous stumbles and better use my upper body strength to keep me upright, I could keep chugging despite a leg working at only 50% (if that). And they are valuable off the trail as well—ideal for flat and hard surfaces. Just use rubber tips (all trekking pole manufacturers offer them as accessories or they come with the poles), and presto, you’ve got double the support of a single cane/staff. The downside in this scenario is that you lose a free hand, so it’s not as practical to use while, say, grocery shopping or getting up to get a bottle of beer from the couch (although letting the pole hang by its strap frees up a hand).
And one last way to use your poles: during aerobic and leg exercises… even in your living room. Yup. I’ve done DVD exercise programs that would have been impossible without the stability of the poles. There’s no way I could’ve done lunges and many other exercises (even kickboxing) without tumbling over. Be forewarned, however, that wildly swinging poles could whack anything within pole distance (flower vase, delicate porcelain statuette, grandfather’s urn, or, oops, spouse). So be careful if you try this. Speaking of working out, just using trekking poles while walking can burn 20-40 percent more calories and works the upper body. Double bonus!
Trekking poles and canes from Leki and Black Diamond were donated for testing purposes.
CAUTION: When you use your trekking poles in any situation other than on a hike, at some point, someone inevitably will make a smart-ass comment to you. “Buddy, I didn’t know it was snowing.” Smile and motor on. Or, if you must, reply with a comment about how you needed the poles just to trek through all of the dandruff flaking off his head, fake stumble, and then pop him in the groin with said pole.

PURCHASING ADVICE
I’ve had the opportunity to put a number of popular trekking poles to the test from the leading makes: Black Diamond, Leki, REI and others. What I’ve discovered is that there are a wealth of options when it comes to trekking poles, and when you have a disease like multiple sclerosis, there’s not one clear-cut design winner. I’ll list each area of the trekking pole that you should consider before making your purchase. And don’t feel pressure to spend triple digits on a set; some highly reviewed poles like these from Cascade cost less than a pint and a burger. But no matter what pole you choose, you’ll be able to explore farther with a pair than without.
Pole deployment. In the old days, circa 2010, you would painstakingly extend the trekking poles to the appropriate length and tighten them up, a process that took about a minute for a couple poles. But nowadays, manufacturers have developed a trick system (similar to tent poles) that has them ready roll in a matter of seconds. Actually, as fast as a second per pole. You snap out the pole and give it a tug, and presto you’ve got a walking aid perfect for wonky multiple sclerosis legs; one example I’ve tried and liked: Black Diamond’s Z-Pole.
Recommendation: If you use poles all or most of the time when you walk, this feature isn’t essential. After all, your poles are already extended. But if you deploy your aids only when you overheat or your legs bonk, and collapse them when you recover, this is a huge timesaver. It’s far more likely that you'll tote your poles if they can deploy in a blink. Otherwise, there’s a good chance you'll leave them in the trunk of your car while running errands, which makes them pretty much useless when you suddenly discover you need them. The downside to these types of poles? Length is often not adjustable.
Locking mechanism. Trekking poles usually have three sections (some have just two) so when fully compacted down they can be easily stored. To use the poles, you expand them to the proper length and secure them into place. Now how they secure (or lock) is rather important, because if it doesn’t work properly (or you don’t have the strength or coordination to make it work properly), you could go down in a heap. On the end of the hike when your legs are gassed, and a lot of your body weight is being supported by the poles, that pole length has to hold. Many poles are secured by firmly twisting the sections of the pole in opposite directions using friction—the tighter you twist, the more reliable the hold. Pass on those. We prefer Black Diamond’s “flick lock” system; a locking mechanism that you can visually see and forcefully lock. Leki offers both an internal lock and a speed lock system.
Recommendation: This is where you need to get your rear end down to your local outdoor store to personally try the different locking mechanisms. I’ve found those that twist tend to be less reliable than those that physically lock, our preference. But that type requires a touch more finger strength to operate so test them out. Easiest of all: the type that snap quickly to length, but that convenience comes at a cost, and length tends not to be adjustable.
Weight. In general, the heavier the poles, the more work you have to do to tote them, whether you are using them or not. All of the poles I've tested are relatively light and differed by a few ounces. But those ounces can add up over a long hike or if you keep them stashed in your oversized purse or man bag. Aluminum is fine, while carbon fiber is the bomb and priced like it.
Recommendation: Light is nice (and pricey), but if you tend to put a lot of force on your poles, a beefier, heavier duty pole is probably a wiser choice.
Length/Packability. If you travel, you should travel with your poles (and don’t forget the rubber walking tips!). Your trekking poles will come in handy in the mountains and on sidewalks—plus you can ditch one if you are going to be needing a free hand. The shorter the poles when collapsed, the easier it will be to find a pack that fits them. That said, you need to make sure the poles extend long enough to accommodate your height. ActiveMSers does not recommend trekking poles with only two sections (not tested in this review), as they are too long to pack into luggage. Recommendation: Don't wait until you are hopping in your car to drive to the airport to discover they don’t fit in your carry on. Pre-pack them first.
Grip/Strap Comfort. It would be easy to overlook the grip and wrist strap, but that would be a mistake. Cork and foam grips are the most comfortable type of grips in this reviewer’s opinion, easily besting rubber (good for skiing, however). Foam tends to be grippiest even with sweaty hands and offers more comfort. When it comes to the wrist strap, it is just as essential to the equation as the grip. Since they need to fit snuggly, nylon straps without padding tend to chafe on long hikes. Look for a soft lining, which will offer maximum comfort.
Recommendation: Walk with them in the store. Some grips have a natural cant to them, which you may or may not find comfortable. Note, the straps are often specific to right or left wrists.
Shock Absorption. Trekking pole enthusiasts (yes, they exist) love to debate built-in shock systems. Some folks swear by them, others prefer a rigid pole. Pros: If you are walloping the earth with each step, the shock system can help prevent jarring and upper body fatigue, reducing stress on joints, muscles, and ligaments. This is especially true on pavement. Cons: Shock systems add weight, length, and expense to the poles, and tend to offer less feedback, so earth and brain might not be on the same wavelength.
Recommendation: I’ve tested both shock and non-shock systems. If the pole was going to remain extended whenever you used them, and you pound them regularly on pavement or hard ground, I might opt for the shock. The Leki Makalu’s I tested were pretty sweet. But if you plan to use the poles when your legs bonk, they’ll probably be toted by you, collapsed. In that case, I would recommend the lighter, no-shock versions.
TRAVEL TIP: Remember that when traveling, it never hurts to have a doctor’s note explaining you have MS. If you don’t, you still should be able to travel with them packed in your carry on if you explain they are a mobility device. Hiking/trekking poles are in a gray area according to the TSA (ski poles are not allowed, however walking canes are). Don’t forget your rubber walking tips—you do not want to use the regular carbide tips on hard surfaces (like sidewalks). And if you are having a time fitting your poles into your luggage, you can take them completely apart (three sections per pole), which shaves off a couple inches. Another packing option: get a small, but long bag just for your poles, and many newer poles already come with a bag.

USING TREKKING POLES
Pshaw, how hard is it to use trekking poles? Not very, but after watching far too many people use them incorrectly, a brief but critical mini lesson is required to get maximum benefit and support when using your poles to walk or hike.
Properly fit your poles. How tall you are determines your correct pole length. Adjust your poles so that when standing, your elbows bend comfortably at a 90-degree angle, with both upper and lower sections being of about the same length. If the poles are adjustable, for long downhills lengthen the poles and, likewise, shorten for lengthy uphill sections. If you are on a long off-camber traverse, you may want to shorten one pole and lengthen the other. When I modify the length of my poles, I usually just adjust the upper section of the pole.
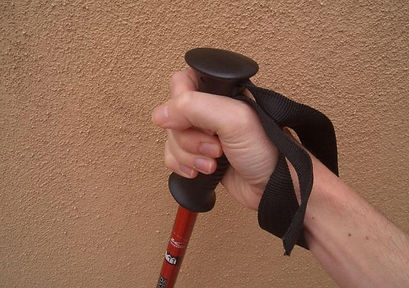
Properly use the wrist strap. This is one of the most overlooked areas of trekking poles, and I would argue the most critical area for MSers. Poles have straps NOT so you don’t lose them or so you can hang them from a coat hook. They are for support, and often poles are designed specifically for right/left wrists, so make sure you are using the correct pole with the correct wrist. To properly use the wrist strap, insert your hand through the bottom of the strap, then bring it down and “shake hands” with the grip—do not twist the hand. Also, do not put the hand in from the top, as this reduces the ability to weight the strap, which is especially important for MSers. Adjust the wrist strap so it fits snuggly and acts as a support (see photo). The wrist strap is NOT supposed to hang loose on the wrist; this will cause unnecessary fatigue of your hands and will not give you maximum support. This is the number one mistake when people use trekking poles, so don’t be like them. You are smarter than that.

Correct grip.
Incorrect grip.
Stride with rhythm. Use poles like you use your arms. When you walk, you swing your arms—opposite leg, opposite arm. So do the same thing, only with your new support appendage. When walking, extend and plant the left pole when the right leg is stepping, and then vice versa—right pole, left leg. If it doesn’t feel normal at first, it will. In more challenging terrain, I’ll plant and secure the pole first before moving a leg. There are times when I’ll double plant both poles for support.
Use rubber stoppers. The tips of trekking poles are great for gripping earth, disastrous for wood floors and icy on tile floors. So I religiously use rubber tips like these to keep me from slipping. (Not the caps that come with poles, those are only to safeguard the tip when not in use.) I tuck the rubber protectors back into a pocket when on the trail.

SINGLE POLE OPTIONS (CANE OR STAFF)
For maximum benefit, ActiveMSers recommends two poles over a single pole, especially outdoors and for distance. But sometimes, as stated above, that isn’t practical.
Your single pole options include staffs and canes and you can find plenty of options from major manufacturers. Folding canes that tuck into a purse or small daypack—where a press of a button can collapse the cane for easy storage—are a good option for when you need a touch of support (but not too much support).
Recommendation: For balance while standing or walking on flat surfaces, the cane trumps the staff due to its style of grip, allowing you to put more support onto the cane. The beefier the cane, the more support. For hiking on hilly terrain, the staff trumps the cane, as it can be placed far in front of you, great for hilly descents. That said, you don’t usually need a free hand while hiking, so why not just use trekking poles in this scenario? So for single pole use, ActiveMSers recommends a cane, especially around the house and for close spaces. If used properly, it provides max support. And if you really want your single pole to do double duty, there are poles out there that can be used as a cane or a staff, the best of both worlds. The Leki Wanderfreund is one that I’ve used and enjoyed (so has the Queen!). Two canes at once? Jesus, no. Use trekking poles or forearm crutches.
Fitting your cane. Stand up straight with shoes on and your arms at your side. The top of the cane should come up to the crease on the underside of your wrist. When using the cane, your elbow should be bent slightly, about 15-20 degrees.

ACTIVEMSERS RECOMMENDATIONS
Trekking poles are so much more stable than a single cane, it’s a head scratcher why more MSers don’t take better advantage of such a helpful walking aid. I strongly encourage you to put any ego concerns aside and plunge in with gusto, because it will open a wealth of new doors in walking freedom. Do not forget to purchase rubber tips along with the poles; the plastic caps that come with most poles are not for walking. For shorter distances, of course, a cane is a wonderful companion.
TOP PERFORMER: Black Diamond Trail Ergo Cork ($130)
While this version was not specifically tested, an earlier Black Diamond model performed exceptionally well. The flick-lock system was the most reliable locking mechanism of the various trekking poles we tested. While other poles might gradually shorten over time or fail suddenly (a decidedly un-fun surprise), these were rock-solid dependable. We also like the foam grip lower down on the handle, an extra helpful place to grab when you are in awkward situations (say, climbing up a high shelf where using the grip is not practical) or toting the poles collapsed. The padded wrist guard is comfy and the cork handle isn’t slippery when sweaty.

TOP PERFORMER: Leki Wanderfreund ($65)
When you need a little walking help, especially in tight quarters, a good cane is essential. This cane has helped me get around the world, from Bhutan to Thailand and beyond. The cork grip is super comfortable (the hole for your index and middle fingers is surprisingly helpful), the locking mechanism (newly improved) is reliable, and the weight of the aluminum is light yet solid. The cane can extend to near staff lengths, which can be invaluable for long downhills. A final bonus: wherever you go people will comment on your cool cane. Imagine that: a cool cane—that is also functional! Let me stress that last point. Yes, that beautifully carved mahogany cane might be sexy as all get out, but the tip is not grippy, it’s not adjustable, and it’s heavy. Sure, it’s a cane, but it’s more of an accessory than an aid.

ALSO CONSIDER: Black Diamond Z Pole ($145+)
Trekking poles as a walking aid are pretty much useless if you leave them in the trunk of your car or in the garage. That’s why we love the Z Pole from Black Diamond. There really is no excuse. They are feather light and collapse down so compactly that you could practically snug them in a back pocket. Okay, they’re not that small, but they’ll fit in virtually any day pack or large purse. And they deploy in a blink, perfect when you’ve to run to the restroom during that annual beer fest that is always so crowded but you go anyway because, duh, beer. The downsides: they aren’t super heavy duty if you need max support and length isn’t adjustable.
